این آموزش بر روی ورژن جدید سنت او اس 7 اجرا می شود
Another great free hosting control panel to install on your VPS, meet CentOS Web Panel. I believe this free control panel will compete greatly with zPanel and Vesta CP to gain more user attention. One thing of it makes me more interested is that CWP will install full LAMP stack plus Varnish Cache server while zPanel can only install LAMP and Vesta CP can install LAMP with Nginx as reverse proxy.
Using a hosting control panel can save times for you to install all necessary software to build a full working web hosting server including needed webserver (Apache, Nginx), mail server, DNS server MySQL database server and FTP server. Installing all those software manually one by one will consume much time with great chance to fail.
Varnish Cache is a great caching platform to store hot cached content of your web pages in RAM. That way it can reduce request to hit backend server hence speeding up your website and reduce CPU load in the same time. Again, installing and setting up Varnish is not really a piece of cake for a newbie.
ABOUT CWP
CWP is -again- a free web hosting control panel designed for newbie who want to build a working hosting server easily and to take control or manage his/her server all in an intuitive web interface without having to open any SSH console. CWP is really considered feature-rich. Some of notable features including:
– Apache Web Server (Mod Security + OWASP rules optional)
– PHP 5.4 (suPHP, SuExec + PHP version switcher)
– MySQL + phpMyAdmin
– Postfix + Dovecot + roundcube webmail (Antivirus, Spamassassin optional)
– CSF Firewall
– File System Lock (no more website hacking, all your files are locked from changes)
– Backups (optional)
– AutoFixer for server configuration
– Varnish Cache server (improve your server performances by 3x)
– Compiles Apache from source (improves up to 15% on performances)
– Apache reCompiler + Additional modules install with one click
– Apache server status, configuration
– Edit apache vhosts, vhosts templates, include configuration
– Rebuild all apache Virtual hosts with one click
– suPHP & suExec (improved security)
– Mod Security + OWASP rules (one click install, easy management)
– Tomcat 8 server management & install in one click
– DoS protection from the Slow-Loris attacks
– Compiles PHP from source (improves up to 20% on performances)
– PHP switcher (switch between PHP versions like: 5.2, 5.3, 5.4, 5.5)
– Simple php editor
– PHP addons with one click
– PHP.ini editor & PHP info & List modules
– php.ini per user account (you can add changes in /home/USER/php.ini)
– postfix & dovecot
– MailBoxes, Alias
– Roundcube webmail
– Postfix Mail queue
– rDNS Checker Module (check you rDNS records)
– AntiSPAM (Spamhaus cronjob)
– Re-Build Postfix/Dovecot Mail server with (AntiVirus, AntiSpam Protection)
– Email Auto Responder
– MySQL Database Managment
– Add local or remote access user
– Live Monitor MySQL process list
REQUIREMENTS
- A server / VPS running CentOS 6 (at the time of writing it still does not support CentOS 7). Clean minimal install is recommended. Need recommendation? try RamNode or DigitalOcean.
- Basic knowledge about most common Unix command to manage a Linux VPS.
- Any favorite SSH client like Putty or simply Terminal if you’re using Linux or Mac.
- Make sure your VPS is running CentOS 6 with no LAMP component installed (Apache, MySQL, PHP)
- About 15 minutes of your time and may be a cup of coffee or tea.
HOW TO INSTALL CWP
Follow steps below to setup CentOS Web Panel on your VPS:
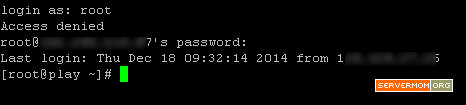
Step 1 – Login to your server as root or as user with sudo privilege:
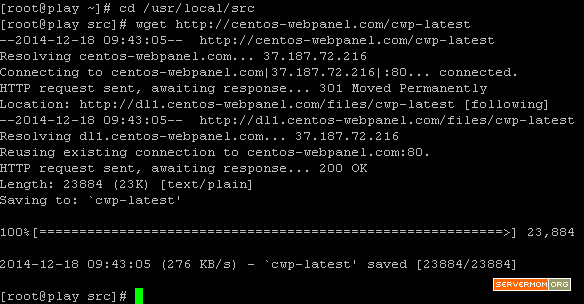
Step 2 – Go to /usr/local/src directory and download CWP installer package there:
|
1
2
|
cd /usr/local/srcwget http://centos-webpanel.com/cwp-latest |
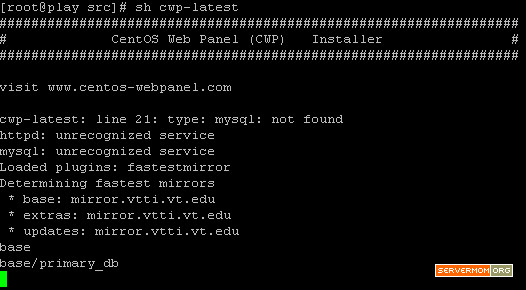
Step 3 – Once downloaded, issue one simple command below to start the installer:
|
1
|
sh cwp-latest |
It will start by firstly check whether Apache or MySQL is installed and running. After that, you may simply wait the process till it done. The whole process should be automatic so just sit tight, wait and drink your coffee.
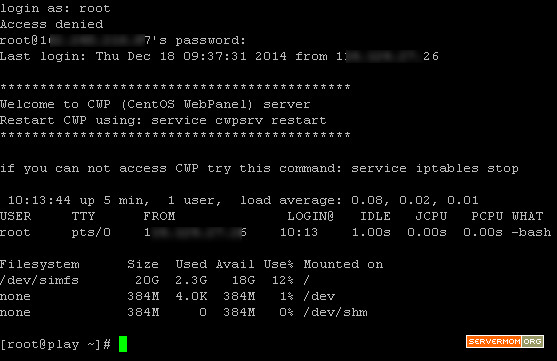
The CWP installation progress will take some times because several software will be compiled from source (especially PHP) for improved performance, security and flexibility. In my case it is almost like installing WHM/cPanel.Once the process is done, you’ll see something like this:
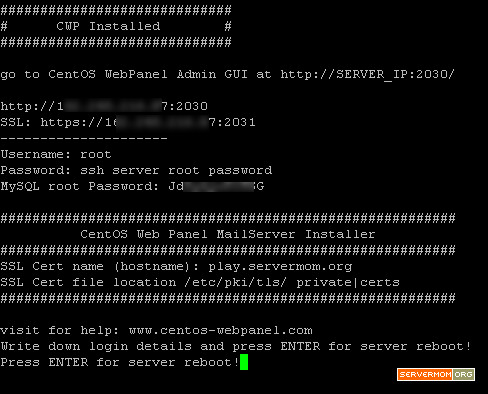
Do not forget to note down the information displayed on screen.
Step 4 – Now hit Enter on your keyboard and your server should reboot automatically. Next time you try to login to your server via SSH, the display will be different. You will now see CWP welcome message.
Step 5 – Open up your favorite web browser (Firefox, Chrome, etc) and open your newly installed CWP admin GUI at one of these URLs:
http://your-ip-address:2030orhttps://your-ip-address:2031
You can use https:// in case if you want to login to your CWP server in middle of unsecure area like public Wifi. Otherwise http:// is much more faster to access.
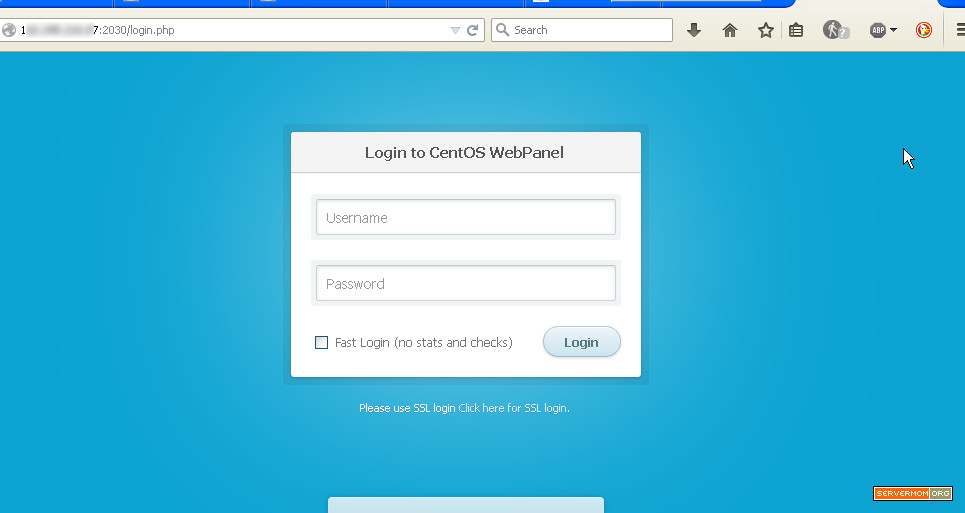
CWP use “root” as default Administrator username and the same password you use to login to your server via SSH as root.
CentOS Web Panel GUI: Dashboard.

CWP RESOURCE USAGE
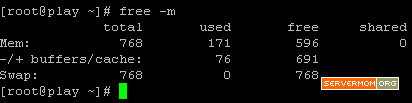
Default installation of CWP consumes very low resource usage. Here’s example of mine:
RAM:
CPU load and disk
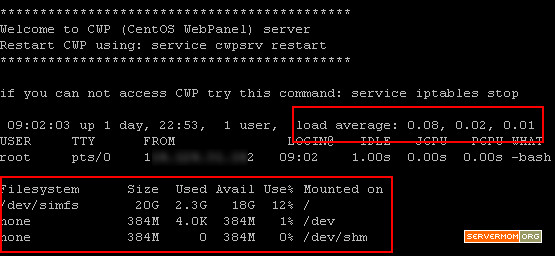
That’s considered low resource usage for a web hosting panel. Also, default installation already includes latest stable version of PHP with Zend Optimizer and ionCube PHP Loader.

That’s all for now.In the next tutorial: Basic configuration of newly installed CWP. Stay tuned!
